Docker 实践二三事
Docker是一个开源的引擎,可以轻松的为任何应用创建一个轻量级的、可移植的、自给自足的容器。开发者在笔记本上编译测试通过的容器可以批量地在生产环境中部署,包括VMs(虚拟机)、bare metal、OpenStack 集群和其他的基础应用平台。

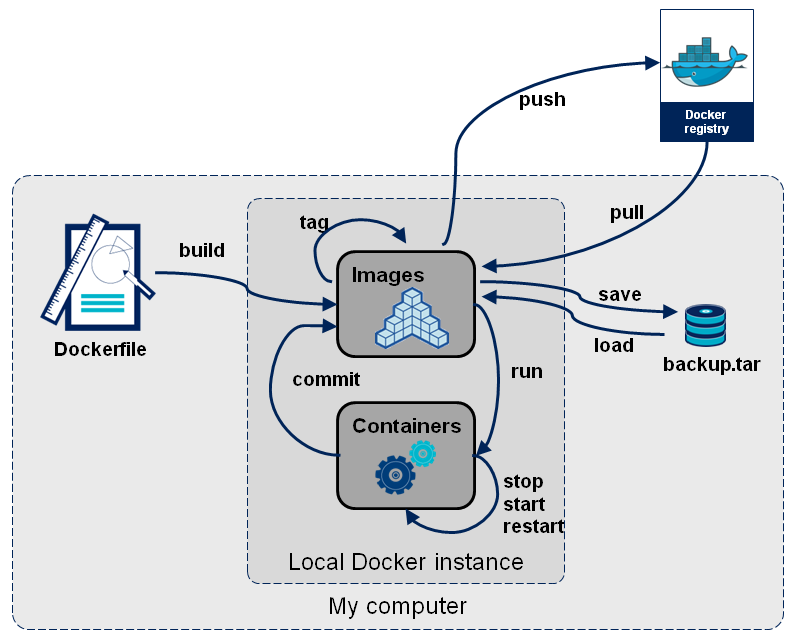
架构

安装
以 Ubuntu 14.04 LTS 下为例
1 | # 更新APT镜像源 |
常用命令
Docker 命令 总的来说分为以下几种:
- 容器生命周期管理 — docker [run|start|stop|restart|kill|rm|pause|unpause]
- 容器操作运维 — docker [ps|inspect|top|attach|events|logs|wait|export|port]
- 容器rootfs命令 — docker [commit|cp|diff]
- 镜像仓库 — docker [login|pull|push|search]
- 本地镜像管理 — docker [images|rmi|tag|build|history|save|import]
- 其他命令 — docker [info|version]
注意 有点需要切换为root用户后进行常用docker操作,以下命令如未特殊说明,均表示在root账户下进行。
列出机器上的镜像(images)
1
2
3
4
5
6
7
8# docker images
REPOSITORY TAG IMAGE ID CREATED VIRTUAL SIZE
ubuntu 14.10 2185fd50e2ca 13 days ago 236.9 MB
…
其中我们可以根据REPOSITORY来判断这个镜像是来自哪个服务器,如果没有 / 则表示官方镜像,类似于username/repos_name表示Github的个人公共库,类似于regsistory.example.com:5000/repos_name则表示的是私服。
IMAGE ID列其实是缩写,要显示完整则带上--no-trunc选项在docker index中搜索image(search)
1
2
3
4
5# docker search seanlo
NAME DESCRIPTION STARS OFFICIAL AUTOMATED
seanloook/centos6 sean's docker repos 0
搜索的范围是官方镜像和所有个人公共镜像。NAME列的 / 后面是仓库的名字。从docker registry server 中下拉image或repository(pull)
1
2
3
4
5
6
7
8
9
10
11# docker pull centos
上面的命令需要注意,在docker v1.2版本以前,会下载官方镜像的centos仓库里的所有镜像,而从v.13开始官方文档里的说明变了:will pull the centos:latest image, its intermediate layers and any aliases of the same id,也就是只会下载tag为latest的镜像(以及同一images id的其他tag)。
也可以明确指定具体的镜像:
# docker pull centos:centos6
当然也可以从某个人的公共仓库(包括自己是私人仓库)拉取,形如docker pull username/repository<:tag_name> :
# docker pull seanlook/centos:centos6
如果你没有网络,或者从其他私服获取镜像,形如docker pull registry.domain.com:5000/repos:<tag_name>
# docker pull dl.dockerpool.com:5000/mongo:latest推送一个image或repository到registry(push)
与上面的pull对应,可以推送到Docker Hub的Public、Private以及私服,但不能推送到Top Level Repository。1
2
3
4
5# docker push seanlook/mongo
login name:
password:
login success从image启动一个container
当利用 docker run 来创建容器时,Docker 在后台运行的标准操作包括
- 检查本地是否存在指定的镜像,不存在就从公有仓库下载
- 利用镜像创建并启动一个容器
- 分配一个文件系统,并在只读的镜像层外面挂载一层可读写层
- 从宿主主机配置的网桥接口中桥接一个虚拟接口到容器中去
- 从地址池配置一个 ip 地址给容器
- 执行用户指定的应用程序
- 执行完毕后容器被终止
使用image创建container并进入交互模式(退出即终止), 使用 **-i -t **,login shell是/bin/bash运行出一个container放到后台运行, 使用 **-d **参数1
2
3
4
5
6
7
8
9
10
11
12
13
14
15
16
17
18
19
20
21# 创建一个根镜像为ubuntu:14.04 名字为ubuntu的交互式 容器
# docker run -i -t --name ubuntu ubuntu:14.04 /bin/bash
# 进入容器
root@85cea785dc:~/ ls
# 退出容器
root@85cea785dc:~/ exit
# 启动
root@DeepMind:~/docker start ubuntu
#查看当前正在运行的容器
# docker ps
#查看所有容器
# docker ps -a
# 依附到正在运行的容器
root@DeepMind:~/docker attach ubuntu
root@85cea785dc:~/-P(大写)表示随机端口,-p 表示指定端口,如下宿主主机端口5000连接到容器34448端口1
2
3# docker run -d ubuntu /bin/sh -c "while true; do echo hello world; sleep 2; done"
ae60c4b642058fefcc61ada85a610914bed9f5df0e2aa147100eab85cea785dc
使用Dockerfile文件 build 生成新的image(镜像)
这里给出github上的一份Dockerfile模板 ubuntu:14.04-niginx,类似于脚本语言,只不过用来编译镜像而已1
2
3
4
5
6
7
8
9
10
11
12
13
14
15
16
17
18
19
20
21
22
23
24
25
26
27#+++++++++++++++++++++++++++++++++++++++
# Dockerfile for webdevops/nginx:ubuntu-14.04
# -- automatically generated --
#+++++++++++++++++++++++++++++++++++++++
# 根镜像
FROM webdevops/base:ubuntu-14.04
# 创建者信息
MAINTAINER info@webdevops.io
LABEL vendor=WebDevOps.io
LABEL io.webdevops.layout=8
LABEL io.webdevops.version=0.55.0
ENV WEB_DOCUMENT_ROOT /app
ENV WEB_DOCUMENT_INDEX index.php
ENV WEB_ALIAS_DOMAIN *.vm
# 安装 nginx
RUN /usr/local/bin/apt-install \
nginx \
&& /opt/docker/bin/provision run --tag bootstrap --role webdevops-nginx \
&& /opt/docker/bin/bootstrap.sh
# 对外开放 80 443 端口
EXPOSE 80 443使用docker build -t niginx . 对当前目录下的Dockerfile文件进行编译
1
2
3
4
5
6
7
8
9
10
11
12
13# docker build -t niginx .
Sending build context to Docker daemon 73.45 MB
Sending build context to Docker daemon
Step 0 : FROM seanlook/nginx
---> aa8516fa0bb7
Step 1 : EXPOSE 80
---> Using cache
---> fece07e2b515
Step 2 : ENTRYPOINT /usr/sbin/nginx -c /etc/nginx/nginx.conf && /bin/bash
---> Running in e08963fd5afb
---> d9bbd13f5066
Removing intermediate container e08963fd5afb
Successfully built d9bbd13f5066删除一个或多个container、image(rm、rmi)
1
2
3
4
5
6
7
8
9
10
11
12
13
14
15
16
17
18
19
20
21
22
23
24
25
26
27
28
29
30
31# docker images <==
ubuntu 13.10 195eb90b5349 4 months ago 184.6 MB
ubuntu saucy 195eb90b5349 4 months ago 184.6 MB
seanlook/ubuntu rm_test 195eb90b5349 4 months ago 184.6 MB
使用195eb90b5349启动、停止一个容器后,删除这个镜像
# docker rmi 195eb90b5349
Error response from daemon: Conflict, cannot delete image 195eb90b5349 because it is
tagged in multiple repositories, use -f to force
2014/11/04 14:19:00 Error: failed to remove one or more images
删除seanlook仓库中的tag <==
# docker rmi seanlook/ubuntu:rm_test
Untagged: seanlook/ubuntu:rm_test
现在删除镜像,还会由于container的存在不能rmi
# docker rmi 195eb90b5349
Error response from daemon: Conflict, cannot delete 195eb90b5349 because the
container eef3648a6e77 is using it, use -f to force
2014/11/04 14:24:15 Error: failed to remove one or more images
先删除由这个镜像启动的容器 <==
# docker rm eef3648a6e77
删除镜像 <==
# docker rmi 195eb90b5349
Deleted: 195eb90b534950d334188c3627f860fbdf898e224d8a0a11ec54ff453175e081
Deleted: 209ea56fda6dc2fb013e4d1e40cb678b2af91d1b54a71529f7df0bd867adc961
Deleted: 0f4aac48388f5d65a725ccf8e7caada42f136026c566528a5ee9b02467dac90a
Deleted: fae16849ebe23b48f2bedcc08aaabd45408c62b531ffd8d3088592043d5e7364
Deleted: f127542f0b6191e99bb015b672f5cf48fa79d974784ac8090b11aeac184eaaff